Welcome back!
Today we will look into the world of Conditional Access – I’ll short it to CA from now.
Even though this could be done at a really fine-grained level and with great complexity – fear not; I will provide you some examples on some really great and fairly easy policies you can implement quickly and improve your security posture with low effort.
Let’s go get those low hanging fruits first!
To start explain what it is, let’s quote Microsoft Learn (What is Conditional Access in Microsoft Entra ID? – Microsoft Entra ID | Microsoft Learn);
“Modern security extends beyond an organization’s network perimeter to include user and device identity. Organizations now use identity-driven signals as part of their access control decisions. Microsoft Entra Conditional Access brings signals together, to make decisions, and enforce organizational policies. Conditional Access is Microsoft’s Zero Trust policy engine taking signals from various sources into account when enforcing policy decisions.”

“Conditional Access policies at their simplest are if-then statements; if a user wants to access a resource, then they must complete an action. For example: If a user wants to access an application or service like Microsoft 365, then they must perform multifactor authentication to gain access.»
So, for your users to gain access, we want to check if they fulfil a set of rules we define. It’s important to understand that CA in itself is not a security function rather than sophisticated security guard that will check if the user is allowed to access the resource or not. So if your CA requires phishing-resistant MFA, you got to have phishing-resistant MFA already implemented in your tenant. (Don’t have that yet? Have a look here; https://prottecio.com/2025/01/19/2025-enable-phishing-resistant-mfa-in-your-tenant/)
Before we begin, let’s take a look at some pre-requisites you should have in place to make it simpler for you;

- Create a BreakGlass Account (BGA)
- Creating CA’s you could unintentionally lock yourself out from the tenant, so be careful! Creating a BGA and exclude this from your CA, this will be your ticket to get in if so. (Don’t have that yet? Have a look at Vlad’s good post about that here; https://www.need4.cloud/post/break-glass-accounts-best-practices)
- If you have an environment with mixed user groups like internal, external, admins, serviceaccounts and so on, have a read on Claus Jespersen’s (and others) articles on
- Design Principals (Conditional Access design principles and dependencies – Azure Architecture Center | Microsoft Learn),
- Architecture (Conditional Access architecture and personas – Azure Architecture Center | Microsoft Learn) and the
- Framwork (Conditional Access framework and policies – Azure Architecture Center | Microsoft Learn) to really understand the complexity and get good tips on naming conventions, user groups and so on.
- The even provide you with a detailed spreadsheet with the most recommended policies for you to start with – I find these as a great tool to document the policies; https://github.com/microsoft/ConditionalAccessforZeroTrustResources/raw/main/ConditionalAccessSamplePolicies/Microsoft%20Conditional%20Access%20for%20Zero%20trust%20persona%20based%20policies.xlsx
- Don’t work with CA alone. As mentioned earlier you could unintentionally lock yourself out, so perform a “buddy-check” with a colleague before you activate them in your environment. You could also activate them in report mode (What is Conditional Access report-only mode? – Microsoft Entra ID | Microsoft Learn) first and check the “Insights and reporting”-function to see how it impacts your tenant before you turn it on and enforce it.
- Policies in report-only mode that require compliant devices may prompt users on Mac, iOS, and Android to select a device certificate during policy evaluation, even though device compliance is not enforced. These prompts may repeat until the device is made compliant. To prevent end users from receiving prompts during sign-in, exclude device platforms Mac, iOS and Android from report-only policies that perform device compliance checks. Note that report-only mode is not applicable for Conditional Access policies with “User Actions” scope.
Enough talking – let’s build some CA’s!
In our examples, I will use the naming conventions, the numbering scheme, the policy types, the personas groups and so on for you to easier compare this with the articles referenced above. I will create more posts on CA’s in the future, but in these first posts we will create the following recommended policies;
- Part 1
- Block Legacy Authentication
- Require phishing-resistant MFA for your admins
- Require MFA authentication strength for all users
- Require MFA authentication strength for guests
- Secure security info registration
- Part 2
- Require MFA for risky sign-in
- Require password change for risky users
- Require MFA authentication strength for device registration
- Require device compliance
- Block Access from all other countries than your own
- Yes, an attacker can buypass this if they use VPN – but in “the wild” I have seen this policy stop a lot of attacks, therefore I prefer to have this active as well. As we talked about before there is no one super-policy to block them all – it’s all about multiple layers.
Block Legacy Authentication (Block legacy authentication with Conditional Access – Microsoft Entra ID | Microsoft Learn)
Quote; “Microsoft recommends that organizations block authentication requests using legacy protocols that don’t support multifactor authentication. Based on Microsoft’s analysis more than 97 percent of credential stuffing attacks use legacy authentication and more than 99 percent of password spray attacks use legacy authentication protocols. These attacks would stop with basic authentication disabled or blocked.”
According to the above-mentioned spreadsheet, this is a X04-policy. But in this test-tenant I won’t make one for admin, one for internal, one for guests, etc – so I will make this a global CA meaning the number will be 004.
- Sign in to the Microsoft Entra admin center as at least a Conditional Access Administrator.
- Browse to Protection > Conditional Access > Policies.
- Select New policy.
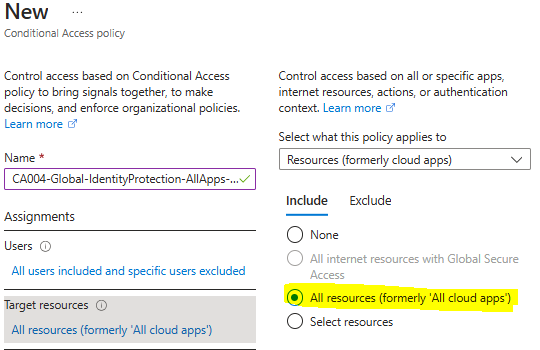
- Give your policy a name. In my test-tenant this will be named CA004-Global-IdentityProtection-AllApps-AnyPlatform-BlockLegacyAuth
- Under Assignments, select Users or workload identities.
- Under Include, select All users. If you’re making individual policies for internal, admins, guests, etc for this, choose the correct group to be included here – for instance CA-Persona-Internals
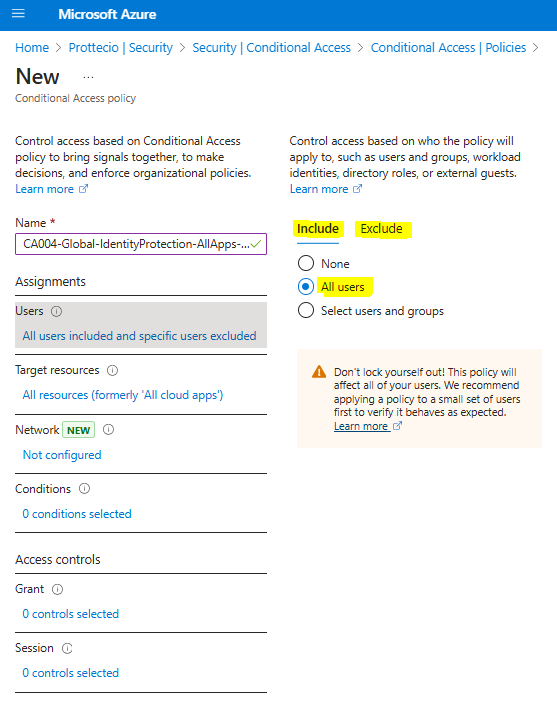
- Under Exclude, select Users and groups and choose any accounts that must maintain the ability to use legacy authentication. According to Microsoft recommendations, we will exclude the Breakglass accounts from these policies.
- Under Target resources > Resources (formerly cloud apps) > Include, select All resources (formerly ‘All cloud apps’).
- Under Conditions > Client apps, set Configure to Yes.
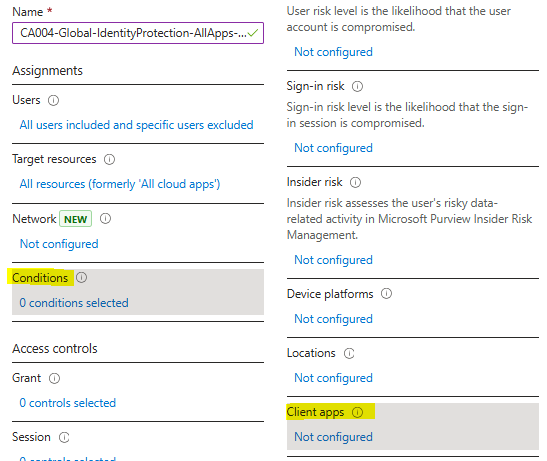
- Check only the boxes Exchange ActiveSync clients and Other clients.
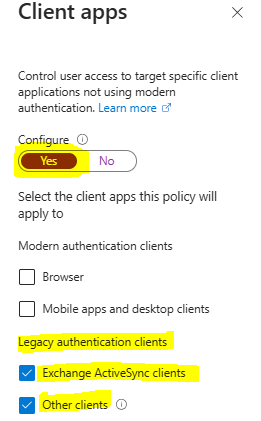
- Select Done.
- Under Access controls > Grant, select Block access.
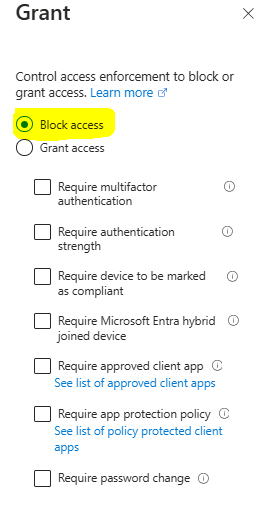
- Select Select.
- Confirm your settings and set Enable policy to Report-only.
- Select Create to create to enable your policy.
Warning!
When you create or perform changes on these CA’s, be aware of the notification that comes, it looks like this. If you do not check the box that says “I understand that my account will be impacted…” you can risk excluding accounts that you don’t wan to exclude from the policy.

Note 1 – on this exact policy, I would recommend to also exclude service accounts/service principals/non-interactive accounts related to hybrid – for instance Entra Connect Sync Account, apps/accounts related to co-mgmt setup between SCCM and Intune, and so on. This is why it is a good idea to create this in Report-mode first and see what the impact is before enable it. Or why it could be wise to make this separate for admins, internals, externals and so on so these accounts/apps don’t get affected and blocked. You could also consider replace those accounts mentioned with managed identities.
Note 2 – As we talked about, CA is not a security function, it’s just a guard. If you do have Exchange on-prem and/or Exchange Hybrid – Legacy Authentication should be blocked and Modern Authentication should be configured. I won’t cover how in this post, but I would like to mention it. Because a trained attacker may read from the CA-error message that you blocked it with CA but it may still be active and find other ways to exploit.
![]() Congratulations – you have now created the CA, let’s do the next one straight away!
Congratulations – you have now created the CA, let’s do the next one straight away!
Require phishing-resistant multifactor authentication for administrators (Require phishing-resistant multifactor authentication for Microsoft Entra administrator roles – Microsoft Entra ID | Microsoft Learn)
Warning!
Before creating a policy requiring phishing-resistant multifactor authentication, ensure your administrators have the appropriate methods registered. If you enable this policy without completing this step you risk locking yourself out of your tenant.
Microsoft recommends you require phishing-resistant multifactor authentication on the following roles at a minimum:
- Global Administrator
- Application Administrator
- Authentication Administrator
- Billing Administrator
- Cloud Application Administrator
- Conditional Access Administrator
- Exchange Administrator
- Helpdesk Administrator
- Password Administrator
- Privileged Authentication Administrator
- Privileged Role Administrator
- Security Administrator
- SharePoint Administrator
- User Administrator
In our test tenant we will simply require this for all admin users on all roles, instead of choosing “Directory Roles” in step 5a.
- Sign in to the Microsoft Entra admin center as at least a Conditional Access Administrator.
- Browse to Protection > Conditional Access > Policies.
- Select New policy.
- Give your policy a name. In my test-tenant this will be called CA100-Admins-BaseProtection-AllApps-AnyPlatform-RequirePhishingResistantMFA
- Under Assignments, select Users or workload identities.
Under Include, select Directory roles and choose at least the previously listed roles.- As mentioned, I will go for Users&groups instead and use the group CA-Persona-Admins.
- Under Exclude, I will not exclude the break glass accounts from this. The reason is the change that happened a while ago where Microsoft now requires MFA on break glass and emergency account also. For these you really should go with FIDO2 or certificate-based authentication for MFA.
- Under Target resources > Resources (formerly cloud apps) > Include, select All resources (formerly ‘All cloud apps’).
- Under Access controls > Grant, select Grant access.
- Select Require authentication strength, then select Phishing-resistant MFA strength from the list.
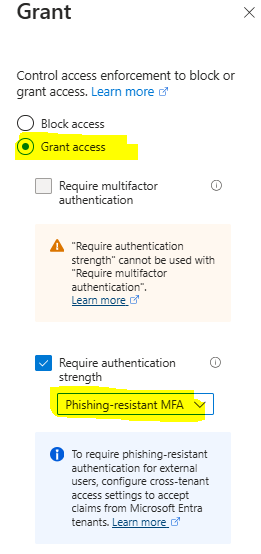
- If you go to Entra admin center, Security, Authentication Methods, Authentication Strengths and choose “Phishing-resistant MFA”, you can see what is included and approved methods. There is three built-in authentication strengths available – but you can also make your own and choose what methods should be included.

- Since we only have one selected control here, it is ok to require one of the selected. If you have several controls, consider if you want to require one or all the selected controls;
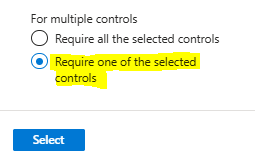
- Select Select.
- Confirm your settings and set Enable policy to Report-only.
- Select Create to create to enable your policy.
![]() There you go, you now require your admins to authenticate with phishing-resistant MFA – well done!
There you go, you now require your admins to authenticate with phishing-resistant MFA – well done!
But we do not rest, let’s protect our internal users with better authentication strength as well, and also require guest-users to use MFA.
Require multifactor authentication for all users (Require MFA for all users with Conditional Access – Microsoft Entra ID | Microsoft Learn)
Even though the recommended policy just says to require authentication strength – we will also require phishing-resistant for the internal users as well.
- Sign in to the Microsoft Entra admin center as at least a Conditional Access Administrator.
- Browse to Protection > Conditional Access > Policies.
- Select New policy.
- Give your policy a name. In my test-tenant this will be called CA200-Internals-BaseProtection-AllApps-AnyPlatform-RequirePhishingResistantMFA
- Under Assignments, select Users or workload identities.
- Under Include, select All users or the CA-Persona-Internals
- Under Exclude:
- Select Users and groups andaccording to Microsoft recommendations, we will exclude the Breakglass accounts from this policy as well.
- Since we have a CA already for CA-Persona-Admins, we will exclude this as well so they’re not hit twice.
- If you use hybrid identity solutions like Microsoft Entra Connect or Microsoft Entra Connect Cloud Sync, select Directory roles, then select Directory Synchronization Accounts
- You might choose to exclude your guest users if you’re targeting them with a guest user specific policy.
- Under Target resources > Resources (formerly cloud apps) > Include, select All resources (formerly ‘All cloud apps’).
- Under Access controls > Grant, select Grant access.
- Select Require authentication strength, then select the built-in Multifactor authentication strength from the list.
- Select Select.
- Confirm your settings and set Enable policy to Report-only.
- Select Create to create to enable your policy.
![]() Your internal users are now also required to use phishing-resistant MFA to gain access, well done!
Your internal users are now also required to use phishing-resistant MFA to gain access, well done!
Require multifactor authentication strength for external users (Conditional Access – Authentication strength for external users – Microsoft Entra ID | Microsoft Learn)
“In external user scenarios, the MFA authentication methods that a resource tenant can accept vary depending on whether the user is completing MFA in their home tenant or in the resource tenant.”
“Authentication strength policies work together with MFA trust settings in your cross-tenant access settings to determine where and how the external user must perform MFA. A Microsoft Entra user first authenticates with their own account in their home tenant. Then when this user tries to access your resource, Microsoft Entra ID applies the authentication strength Conditional Access policy and checks to see if you enabled MFA trust.“
- “If MFA trust is enabled, Microsoft Entra ID checks the user’s authentication session for a claim indicating that MFA was fulfilled in the user’s home tenant.“
- “If MFA trust is disabled, the resource tenant presents the user with a challenge to complete MFA in the resource tenant using an acceptable authentication method.”
In our test tenant we haven’t done any setup for MFA trust settings, therefore we will set this up by just requiring MFA and don’t dive into the authentication strength. For your tenant you must decide if you want to be more restrictive.
- Sign in to the Microsoft Entra admin center as at least a Conditional Access Administrator.
- Browse to Protection > Conditional Access > Policies.
- Select New policy.
- Give your policy a name. In my test tenant this will be called CA400-Guests-BaseProtection-AllApps-AnyPlatform-MFA.
- Under Assignments, select Users or workload identities.
- Under Include, choose Select users and groups, and then select Guest or external users.
- Select the types of guest or external users you want to apply the policy to.
- Under Exclude, select Users and groups and choose your organization’s emergency access or break-glass accounts.
- Under Include, choose Select users and groups, and then select Guest or external users.
- Under Target resources > Resources (formerly cloud apps), under Include or Exclude, select any applications you want to include in or exclude from the authentication strength requirements.
- Under Access controls > Grant, select Grant access.
- Select Require authentication strength, then select the appropriate built-in or custom authentication strength from the list.
- Select Select.
- Confirm your settings and set Enable policy to Report-only.
- Select Create to create to enable your policy.

Before we do the next one, let’s take a minute to mention the feature called “Named Locations in CA. Location based access controls rely on the source of IP of a request to determine the location of the user at the time of the request. It’s not easy to perform spoofing on the public internet, but protection afforded by network boundaries might be considered less relevant than it once was. Microsoft don’t recommend relying solely on location as a condition for access.
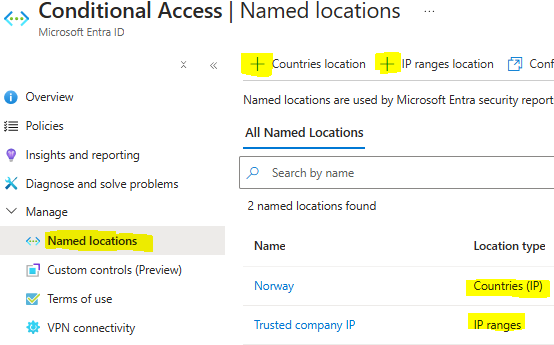
I see a lot of examples where you exclude requirement for MFA on a trusted network – I personally would not do that exclusion. Zero Trust, always verify!
But for this tenant, I will make two Named locations so we can use them in later CA’s. For your tenant I would also recommend these two. One is for your outside address for your company or your “trusted IP” and one for your home country. In my case that would be Norway.
These are pretty straight forward so let’s just make them
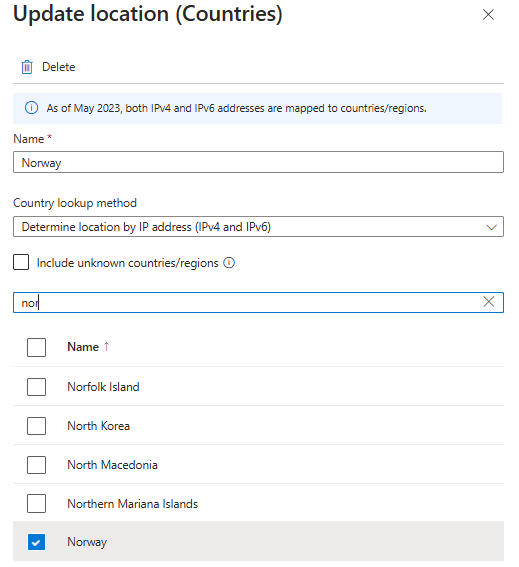
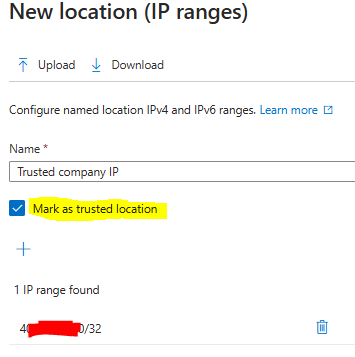
Now we can go ahead and do the next policy
Protect security info registration with Conditional Access policy (Control security information registration with Conditional Access – Microsoft Entra ID | Microsoft Learn)
“Securing when and how users register for Microsoft Entra multifactor authentication and self-service password reset is possible with user actions in a Conditional Access policy. This feature is available to organizations who enable combined registration. This functionality allows organizations to treat the registration process like any application in a Conditional Access policy and use the full power of Conditional Access to secure the experience. Users signing in to the Microsoft Authenticator app or enabling passwordless phone sign-in are subject to this policy.
Some organizations in the past might have used trusted network location or device compliance as a means to secure the registration experience. With the addition of Temporary Access Pass in Microsoft Entra ID, administrators can provide time-limited credentials to their users that allow them to register from any device or location. Temporary Access Pass credentials satisfy Conditional Access requirements for multifactor authentication.»
If you want to go with the policy in the Microsoft Learn article, go ahead. In the test tenant, I will make my own version of it.
The first version is;
- Sign in to the Microsoft Entra admin center as at least a Conditional Access Administrator.
- Browse to Protection > Conditional Access > Policies.
- Select New policy.
- In Name, Enter a Name for this policy. In my test tenant this will be called CA201-Internals-IdentityProtection-AllApps-AnyPlatform-CombinedRegistration
- Under Assignments, select Users or workload identities.
- Under Include, select All users.
Warning
Users must be enabled for the combined registration. - Under Exclude.
- Select All guest and external users.
Note
Temporary Access Pass does not work for guest users. - According to Microsoft recommendations, we will exclude the Breakglass accounts from this policy as well
- Select All guest and external users.
- Under Include, select All users.
- Under Target resources > User actions, check Register security information.
- The Microsoft Learn article will here recommend you to include any location and exclude all trusted locations. I will skip this. In Part 2 I’ll show you a policy that includes location on this. That way you ensure your users need to be connected to your trusted locations to perform this.
- Under Access controls > Grant, select Grant access.
- Select Require authentication strength, then select the appropriate built-in or custom authentication strength from the list.
- Optional, but recommended; Require device to be marked as compliant (We will look into this when we get to the “world of Intune” later.
- Optional, but recommended; Require Hybrid Azure AD joined device
- These two will ensure that your users can perform this on your company computers only – and this will stop any attacker on their own device trying to register security information on a compromised user.
- Decide if you want to Require one of or all the selected controls if you chose to do 8b and 8c as well and select Select.
- Confirm your settings and set Enable policy to Report-only.
- Select Create to create to enable your policy.
Note – you should also make a policy like this for your admins!
That’s it for Part 1 – I hope this has helped you to get started on CA and that you now have improved your security posture a little bit more.
In Part 2 we will cover some policies for risky users, risky sign-ins and a bit on signals from devices – requiring they are compliant and how your users can register them in a safe matter.
Until next time!


