Welcome back!
This is part 2 in the CA series – if you haven’t checked Part 1 yet, you can find it here; https://prottecio.com/2025/03/02/2025-conditional-access-ca-policy-part-1-get-started/
Today we will build a policy to block risky sign-in, risky user, securing device registration and more!
Before we start, be sure to check out a new Preview feature of how your CA will impact – you can find it here;

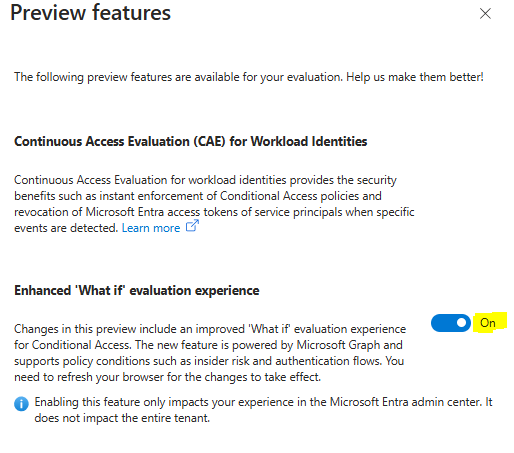
Refresh you browser and you will now have a cool feature if you go into one of your already created policies and see this;

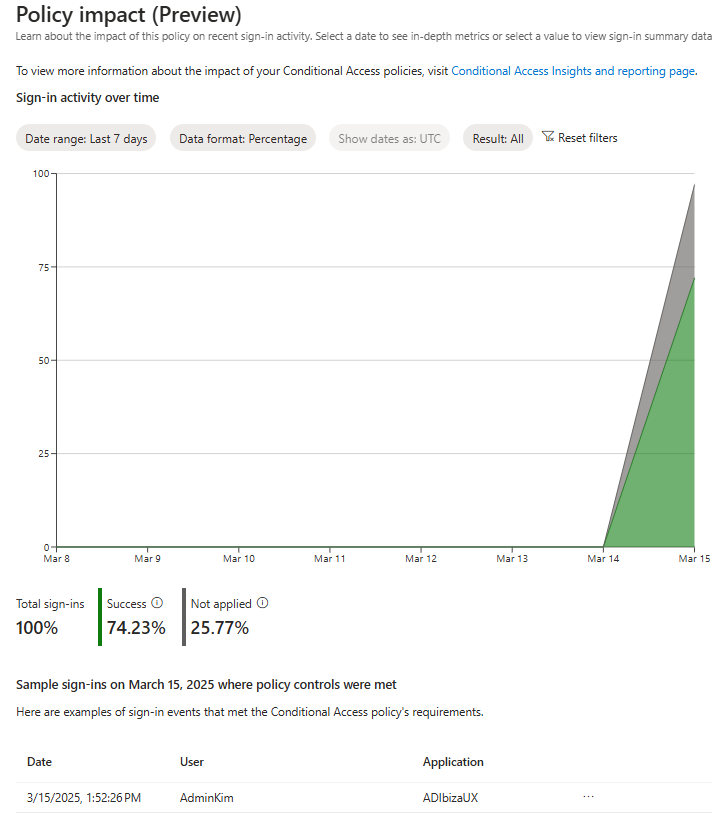
But now, let’s dive right in and start with the next one in the list;
Require MFA for risky sign-in (Sign-in risk-based multifactor authentication – Microsoft Entra ID | Microsoft Learn)
Quote; “Most users have a normal behavior that can be tracked, when they fall outside of this norm it could be risky to allow them to just sign in. You might want to block that user or maybe ask them to perform multifactor authentication to prove that they’re really who they say they are.
A sign-in risk represents the probability that a given authentication request isn’t the identity owner. Organizations with Microsoft Entra ID P2 licenses can create Conditional Access policies incorporating Microsoft Entra ID Protection sign-in risk detections.
The Sign-in risk-based policy protects users from registering MFA in risky sessions. If users aren’t registered for MFA, their risky sign-ins are blocked, and they see an AADSTS53004 error.“
NOTE – Since we require passwordless and phishing-resistant MFA on our users in this test-tenant, I will make a change in step 8 a) and choose Authentication Strength instead. In a real-life scenario you should also consider make an own policy for admin, one for internal users, one for external, one for guests, and so on. In this Example, I will make on for the internals only.
- Sign in to the Microsoft Entra admin center as at least a Conditional Access Administrator.
- Browse to Protection > Conditional Access.
- Select New policy.
- Give your policy a name. In my test-tenant this will be named CA203-Internals-IdentityProtection-AllApps-AnyPlatform-MFAforMediumandHighSignInRisks
- Under Assignments, select Users or workload identities.
- Under Include, select the Users you want to include. Since I’m making one for Admins, I select the CA-Persona-Internals group.
- Under Exclude, select Users and groups and choose your organization’s emergency access or break-glass accounts.
- Select Done.
- Under Cloud apps or actions > Include, select All resources (formerly ‘All cloud apps’).
- Under Conditions > Sign-in risk, set Configure to Yes.
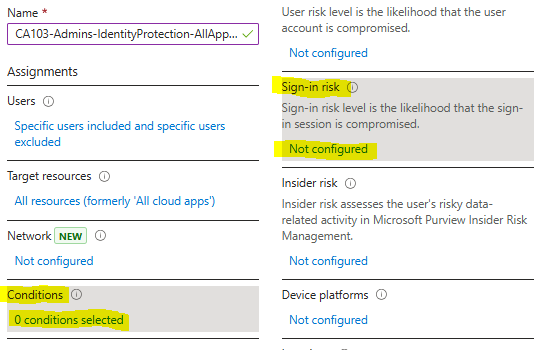
- Under Select the sign-in risk level this policy will apply to, select High and Medium. This guidance is based on Microsoft recommendations and might be different for each organization
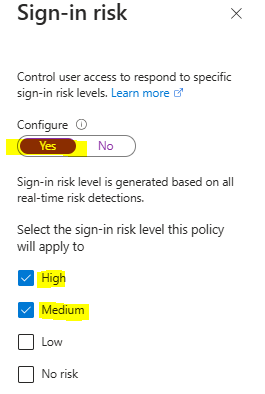
- Select Done.
- Under Access controls > Grant, select Grant access.
- Select Require authentication strength, then select the built-in Multifactor authentication authentication strength from the list.
- Select Select.
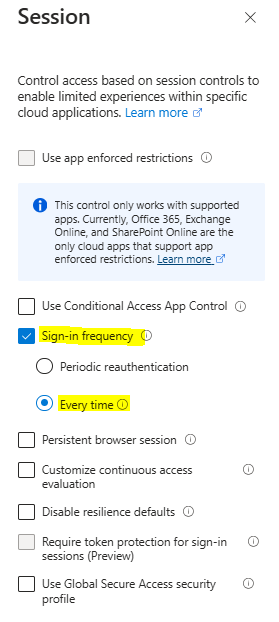
- Under Session.
- Select Sign-in frequency.
- Ensure Every time is selected.
- Select Select.
- Confirm your settings and set Enable policy to Report-only.
- Select Create to create to enable your policy.
Microsoft has started making these in some tenants in Report-Mode. If you see one in your tenant, you can switch that off, so you only have one policy for this now.

Next on the list is;
Require a secure password change for elevated user risk (User risk-based password change – Microsoft Entra ID | Microsoft Learn)
You might need to have two policies for a period of time while deploying passwordless methods.
- One that allows self-remediation for those not using passwordless methods.
- Another that blocks passwordless users at high risk.
Since we have enabled paswordless already in the test-tenant, I will make a change in 8 a) and instead of granting access with MFA and require password change like the original setup says, I will change it to Block access. This means an admin will have to investigate and remediate by unblocking the user – so here you have to decide what works best with your business needs.
- Sign in to the Microsoft Entra admin center as at least a Conditional Access Administrator.
- Browse to Protection > Conditional Access.
- Select New policy.
- Give your policy a name. I’m making this for my internal users in the test-tenant, therefore I will call it CA202-Internals-IdentityProtection-AllApps-AnyPlatform-BlockMediumandHighSignInRisks
- Under Assignments, select Users or workload identities.
- Under Include, I’m making this for my internal users in the test-tenant and therefore will select CA-Persona-Internals.
- Under Exclude, select Users and groups and choose your organization’s emergency access or break-glass accounts.
- Select Done.
- Under Cloud apps or actions > Include, select All resources (formerly ‘All cloud apps’).
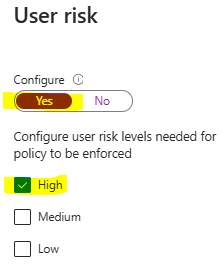
- Under Conditions > User risk, set Configure to Yes.
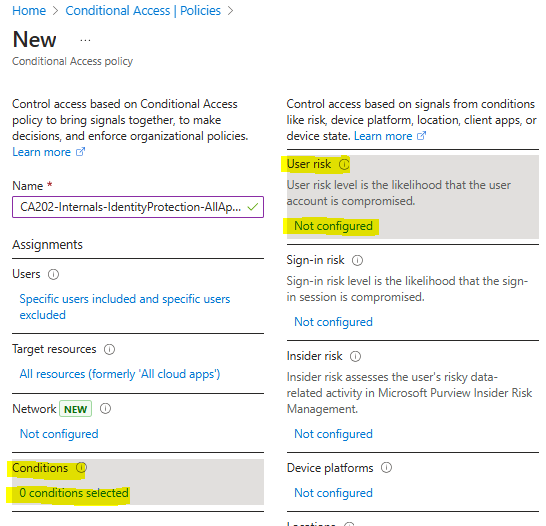
- Under Configure user risk levels needed for policy to be enforced, select High. This guidance is based on Microsoft recommendations and might be different for each organization
- Select Done.
- Under Access controls > Grant, select Block access. If you don’t have passwordless and want the user to self-remediate with MFA and passwordchange, choose Grant instead and follow the steps in 8 a, b and c.
- Select Require authentication strength, then select the built-in Multifactor authentication authentication strength from the list.
- Select Require password change.
- Select Select.
- Under Session.
- Select Sign-in frequency.
- Ensure Every time is selected.
- Select Select.
- Confirm your settings and set Enable policy to Report-only.
- Select Create to create to enable your policy.
You have no successfully taken control over risky sign-ins and risky users, awesome!
There is settings for these if you go to Entra-portal –> Settings –> Identity Protection –> Protect and you will find “User risk policy” and “Sign-in risk policy”. But there you will find a note on the top where Mirosoft recommends migrating these to CA – and the two policies we just made do this – good job! (Risk policies – Microsoft Entra ID Protection | Microsoft Learn)
Our next policy is for registering devices in the tenant. You may already have this set up here (Image is taken from Microsoft Learn and is property of Microsoft);
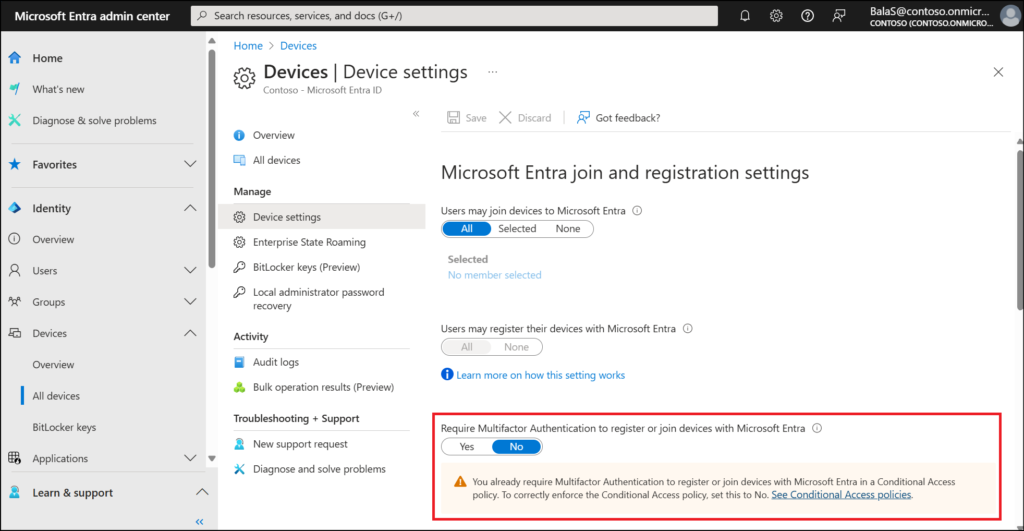
According to your policies you may also restrict this happening at all – and for joining devices you may have automated process with for instance co-mgmt with EndpointManager (SCCM) on-prem, Autopilot or other routines in place. But I will still show this as it is in the list of recommended from Microsoft. If this doesn’t apply to your businesspolicy or needs – skip it.
Microsoft says that “When a Conditional Access policy is configured with the Register or join devices user action, you must set Identity > Devices > Overview > Device Settings – Require Multifactor Authentication to register or join devices with Microsoft Entra to No. Otherwise, Conditional Access policies with this user action aren’t properly enforced. More information about this device setting can found in Configure device settings.”
Further on, they inform that “If you use external authentication methods, these are currently incompatible with authentication strength and you should use the Require multifactor authentication grant control.”

With that in mind, let’s go!
Require multifactor authentication for device registration (Require MFA for device registration – Microsoft Entra ID | Microsoft Learn)
- Sign in to the Microsoft Entra admin center as at least a Conditional Access Administrator.
- Browse to Protection > Conditional Access > Policies.
- Select New policy.
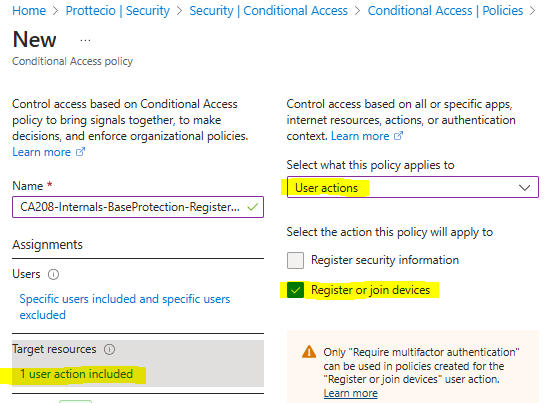
- Give your policy a name. In my test-tenant we are making this for our internal users and therefore we name it CA208-Internals-BaseProtection-RegisterDevice-RequirePhishingResistantMFA.
- Under Assignments, select Users or workload identities.
- Under Include, select All users.
- Under Exclude, select Users and groups and choose your organization’s emergency access or break-glass accounts.
- Under Target resources > User actions, select Register or join devices.
- Under Access controls > Grant, select Grant access.
- Select Require authentication strength, then select the built-in Multifactor authentication authentication strength from the list. In my test-tenant, we choose phishing-resistant FIDO.
- Select Select.
- Confirm your settings and set Enable policy to Report-only.
- Select Create to create to enable your policy.

The next one, I will recommend you proceed with caution!
Require device compliance with Conditional Access (https://learn.microsoft.com/en-us/entra/identity/conditional-access/policy-all-users-device-compliance)
Without a compliance policy created in Microsoft Intune, this Conditional Access policy won’t function as intended. Create a compliance policy first and ensure you have at least one compliant device before proceeding.
WARNING!
If you require a compliant device for accessing your resources, you should really have a good understanding on what makes your device compliant and what may mark it as non-compliant. Worst-case scenario here is that you lock yourself out.
WARNING2!
On iOS, Android, macOS, and some non-Microsoft web browsers, Microsoft Entra ID identifies the device using a client certificate that is provisioned when the device is registered with Microsoft Entra ID. When a user first signs in through the browser the user is prompted to select the certificate. The end user must select this certificate before they can continue to use the browser.
This means that even in report-mode, this could trigger a certificate-prompt on your users mobile devices.
The last tweak I will do on this is to include “Require Microsoft Entra hybrid joined device”. I will also do so we require one of the selected controls.
- Sign in to the Microsoft Entra admin center as at least a Conditional Access Administrator.
- Browse to Protection > Conditional Access > Policies.
- Select New policy.
- Give your policy a name. In my test-tenant I will make this for my internal users, therefore I will call it CA200-Internals-BaseProtection-AllApps-AnyPlatform-CompliantorAADHJ.
- Under Assignments, select Users or workload identities.
- Under Include, I will choose CA-Persona-Internals, if you want this on all users, select All users
- Under Exclude:
- Select Users and groups
- Choose your organization’s emergency access or break-glass accounts.
- If you use hybrid identity solutions like Microsoft Entra Connect or Microsoft Entra Connect Cloud Sync, select Directory roles, then select Directory Synchronization Accounts
- Under Target resources > Resources (formerly cloud apps) > Include, select All resources (formerly ‘All cloud apps’).
- Under Access controls > Grant.
- Select Require device to be marked as compliant. This is where I also choose “Require Microsoft Entra hybrid joined device” and choose require one of the selected controls

- Select Select.
- Confirm your settings and set Enable policy to Report-only.
- Select Create to create to enable your policy.
Note – If you want to exclude mobile devices, you do this under Conditions –> Device platforms –> Choose Yes on Configure and exclude there.
Note – You can enroll your new devices to Intune even if you select Require device to be marked as compliant for All users and All resources (formerly ‘All cloud apps’) using the previous steps. The Require device to be marked as compliant control doesn’t block Intune enrollment.
Good job, now for the last one on the recommended list from Microsoft;

Block authentication flows with Conditional Access policy (Block authentication flows with Conditional Access policy – Microsoft Entra ID | Microsoft Learn)
An authentication flow refers to the process by which a user or application proves its identity to access a system or resource. It involves steps like entering credentials, verifying identity, and obtaining tokens for secure access. Examples include OAuth 2.0 flows, device code flows, and authorization code flows. (Authentication flows as a condition in Conditional Access policy – Microsoft Entra ID | Microsoft Learn)
Blocking certain authentication flows with Conditional Access is crucial for enhancing security. Some flows, like the device code flow, can be vulnerable to phishing attacks or unauthorized access, especially on unmanaged devices. By using Conditional Access policies, organizations can restrict or block risky flows, ensuring that only secure and compliant devices or users can access sensitive resources.
For organizations that have no established use of device code flow, blocking can be done with the following Conditional Access policy:
- Sign in to the Microsoft Entra admin center as at least a Conditional Access Administrator.
- Browse to Protection > Conditional Access > Policies.
- Select New policy.
- Under Assignments, select Users or workload identities.
- Under Include, select the users you want to be in-scope for the policy (all users recommended).
- Under Exclude:
- Select Users and groups and choose your organization’s emergency access or break-glass accounts and any other necessary users this exclusion list should be audited regularly.
- Under Target resources > Resources (formerly cloud apps) > Include, select the apps you want to be in-scope for the policy (All resources (formerly ‘All cloud apps’) recommended).
- Under Conditions > Authentication Flows, set Configure to Yes.
- Select Device code flow.
- Select Done.
- Under Access controls > Grant, select Block access.
- Select Select.
- Confirm your settings and set Enable policy to Report-only.
- Select Create to create to enable your policy.
Use the Authentication flows condition in Conditional Access to manage the feature. You might want to block authentication transfer if you don’t want users to transfer authentication from their PC to a mobile device. For example, if you don’t allow Outlook to be used on personal devices by certain groups. Blocking authentication transfer can be done with the following Conditional Access policy:
- Sign in to the Microsoft Entra admin center as at least a Conditional Access Administrator.
- Browse to Protection > Conditional Access.
- Select Create new policy.
- Under Assignments, select Users or workload identities.
- Under Include, select All users or user groups you would like to block for authentication transfer.
- Under Exclude:
- Select Users and groups and choose your organization’s emergency access or break-glass accounts and any other necessary users this exclusion list should be audited regularly.
- Under Target resources > Resources (formerly cloud apps) > Include, select All resources (formerly ‘All cloud apps’) or apps you would like to block for authentication transfer.
- Under Conditions > Authentication Flows, set Configure to Yes
- Select Authentication transfer.
- Select Done.
- Under Access controls > Grant, select Block access.
- Select Select.
- Confirm your settings and set Enable policy to Enabled.
- Select Create to create to enable your policy.
That’s it, we are done with the recommended ones from Microsoft Learn Conditional Access section – well done!

But as promised, I will show you one more. This is not a fool proof one. It will block logins from other countries then your own – but this could easily be bypassed with VPN for instance. But I have seen this policy save several companies from phishing attacks, so I recommend this as one of the layers in your CA-policies.
- Sign in to the Microsoft Entra admin center as at least a Conditional Access Administrator.
- Browse to Protection > Conditional Access.
- Select New policy.
- Give your policy a name. I will make this global as both admin and internal users in my test-tenant shouldn’t log in from other countries. I will therefore call it CA003-Global-BaseProtection-AllApps-AnyPlatform-AnyLocationNotNorway-Block
- Under Assignments, select Users or workload identities.
- Under Include, select All users.
- Under Exclude, select Users and groups and choose your organization’s emergency access or break-glass accounts.
- Select Done.
- Under Cloud apps or actions > Include, select All resources (formerly ‘All cloud apps’).
- Under Network, set Configure to Yes, and “Any network or location” in Include and in Exclude you choose “Selected networks and locations” and choose the country you made in blog-part 1. In my case, I choose Norway from the list.
- Under Access controls.
- Select Grant.
- Ensure Block Access is selected.
- Select Select.
- Confirm your settings and set Enable policy to Report-only.
- Select Create to create to enable your policy.
For now, that’s it on CA. If you have any recommendations on other good policies – please let me know!
See you next time!


